(505) 280-5216
Homeowners: Seal Grout After Cleaning with a Simple Water Bead Test
Yes, sealing is worth it for almost every home with cement-based grout. It resists stains, slows moisture absorption, and cuts down on scrubbing time, which adds years to your tile’s clean appearance. The one exception is epoxy grout, which doesn’t need sealing at all. Even sealed grout isn’t fully waterproof, so run a quick water-bead test before you assume you’re covered.
TL;DR:
- Sealing cement-based grout is recommended for most homes to prevent stains, reduce moisture absorption, and simplify cleaning, but it does not make grout fully waterproof.
- Penetrating sealers are ideal for wet areas like showers and floors due to their breathability, while topical sealers suit low-moisture spots such as decorative backsplashes.
- Reapplication is necessary every 6 to 24 months for showers and tubs, and every 1 to 3 years for kitchen floors or backsplashes, depending on usage and cleaning habits.
- Proper preparation, including thorough cleaning and dry time, is critical for effective sealing, with professional services often providing better long-term results for heavily stained or high-traffic areas.
- DIY sealing is feasible for small spaces if grout is cleaned first and correctly dried, but professional sealing ensures deeper, longer-lasting protection, especially in areas with heavy buildup.
Table of Contents
- What Grout Sealing Actually Does
- Why Homeowners Notice the Difference Fast
- Choosing the Right Sealer for Each Room
- How Often You Actually Need to Reseal
- Preparing and Applying Sealer: DIY Steps vs. Calling a Pro
- Myths That Convince Homeowners to Skip Sealing
- A Grout Specialist’s Take on Sealing After Cleaning
- Book Grout Sealing With Royal Carpet and Tile Cleaning
- Sources
- FAQ
What Grout Sealing Actually Does
Cement-based grout is porous by nature, full of tiny channels that soak up whatever touches them, from spilled wine to shower runoff. Sealing fills or coats those channels so liquids sit on the surface instead of sinking in.
There are two main approaches, and manufacturers treat them differently:
- Penetrating (impregnating) sealers soak into the grout and protect from within, without changing how the surface looks. Mapei’s own technical guidance notes these are commonly recommended for wet areas even when a sealer isn’t strictly required by code.
- Topical (membrane) sealers form a thin film on top of the grout line, which works well in low-moisture spots but can trap humidity in a bathroom.
None of this makes grout waterproof. Sealing buys you time to wipe up a spill before it stains, and it slows the moisture that drives mold and mildew, but it doesn’t eliminate the need for ventilation or regular care. Epoxy grout is the outlier here. It’s already resin-based and largely nonporous, so sealing adds little to no benefit.
Why Homeowners Notice the Difference Fast
The benefits of sealing grout show up in ways you’ll actually see week to week, not just in a lab test.
- Stain resistance. Coffee, wine, and hard-water minerals sit on sealed grout instead of soaking into it, which means less permanent discoloration around sinks and shower floors.
- Easier cleaning. A quick wipe with a mild cleaner replaces the scrub-brush sessions unsealed grout demands, since grime has less to grab onto.
- Lower mold and mildew risk. Sealed grout absorbs less moisture, which matters most in showers and steam-heavy bathrooms. Good bathroom ventilation still does the heavy lifting, but sealing removes one of mildew’s favorite hiding spots.
- Longer grout and tile lifespan. Grout that isn’t constantly saturated resists crumbling and cracking, which pushes off the cost of regrouting or tile repair.
This Old House’s research on grout maintenance confirms that sealing reduces stain penetration and moisture absorption at the same time, which is exactly why it tackles two problems, discoloration and mildew, with one product application.
Pro Tip: If your grout already looks patchy or discolored in spots, clean it thoroughly first. Sealing over existing stains locks them in permanently.
Choosing the Right Sealer for Each Room
Not every sealer belongs in every room, and picking the wrong type can backfire. The Spruce’s breakdown of sealer types draws a clear line between penetrating and topical products, and that distinction should drive your choice.
- Penetrating sealers are the default for showers, bathroom floors, and kitchen floors. They stay breathable, so moisture that does get in can still escape, which avoids the clouding or peeling that topical sealers sometimes show in humid rooms.
- Topical (membrane) sealers fit better on decorative backsplashes or low-moisture accent floors, where you want a visible sheen and humidity isn’t a daily concern.
- Epoxy and specialty sealers make sense in flood-prone areas, commercial kitchens, or anywhere maximum chemical resistance matters more than breathability.
A quick way to think about it: showers and floors call for penetrating products, backsplashes tolerate topical ones, and high-risk commercial or wet-basement tile often justifies the extra cost of an epoxy system. Royal Carpet and Tile Cleaning’s guide to grout sealer types walks through room-by-room picks in more detail if you want to match a product to your exact layout.
How Often You Actually Need to Reseal
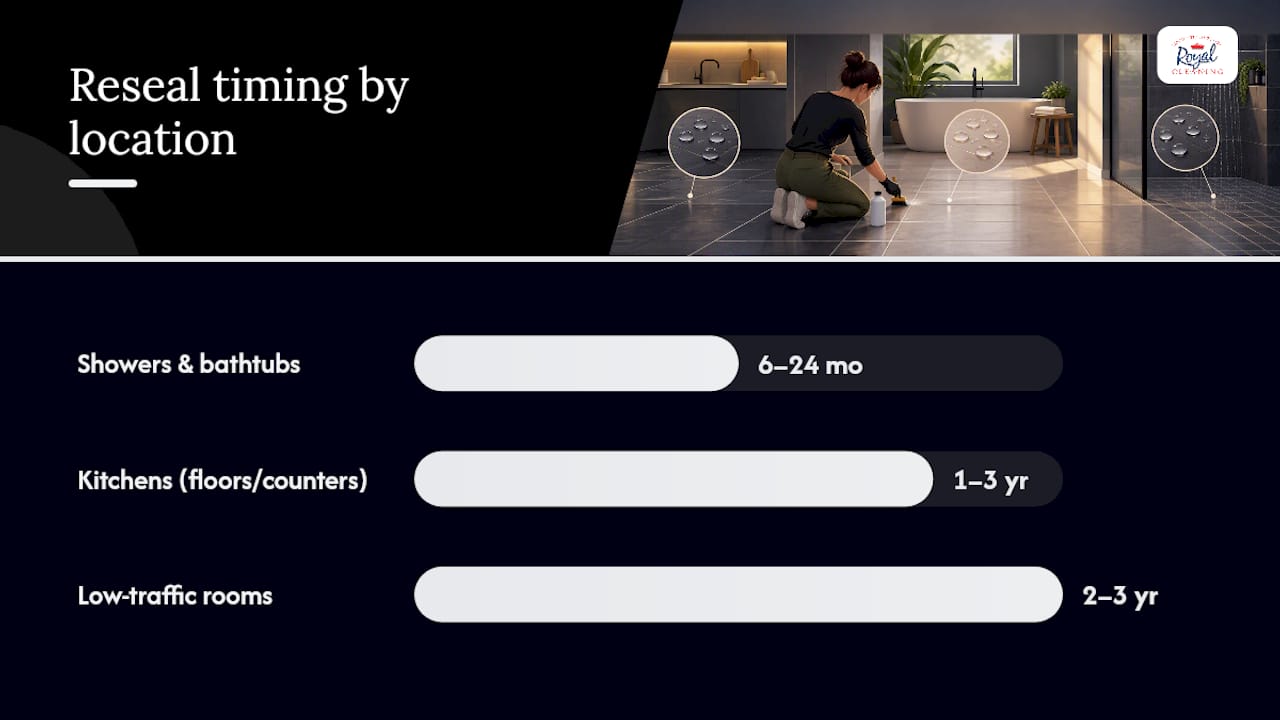
Reseal timing isn’t one-size-fits-all. It depends on where the tile lives and how hard it works.
- Showers and bathtubs: every 6 to 24 months, since standing water and soap residue wear sealant down fastest.
- Kitchen floors, counters, and backsplashes: every 1 to 3 years, based on traffic and exposure to cooking spills.
- Low-traffic rooms like guest bathrooms or hallways: often 2 to 3 years between applications.
Better Homes & Gardens lists these same ranges and ties them to sealer type, foot traffic, and how often you’re using harsh cleaning chemicals, which can strip protection faster than plain water ever would.
Testing beats guessing. Drop a few beads of water onto the grout line. If it beads up and sits, you’re still protected. If it soaks in and darkens the grout within a minute or two, it’s time to reseal.
Pro Tip: Always check the sealer manufacturer’s cure-time instructions before applying a second coat. New grout usually needs to cure fully, often 48 to 72 hours, before it will accept sealer correctly.
Preparing and Applying Sealer: DIY Steps vs. Calling a Pro
Sealing over dirty grout traps the grime underneath, so cleaning always comes first.
- Deep clean the grout. Remove soap scum, mineral buildup, and any visible stains using a grout-safe cleaner and a stiff brush.
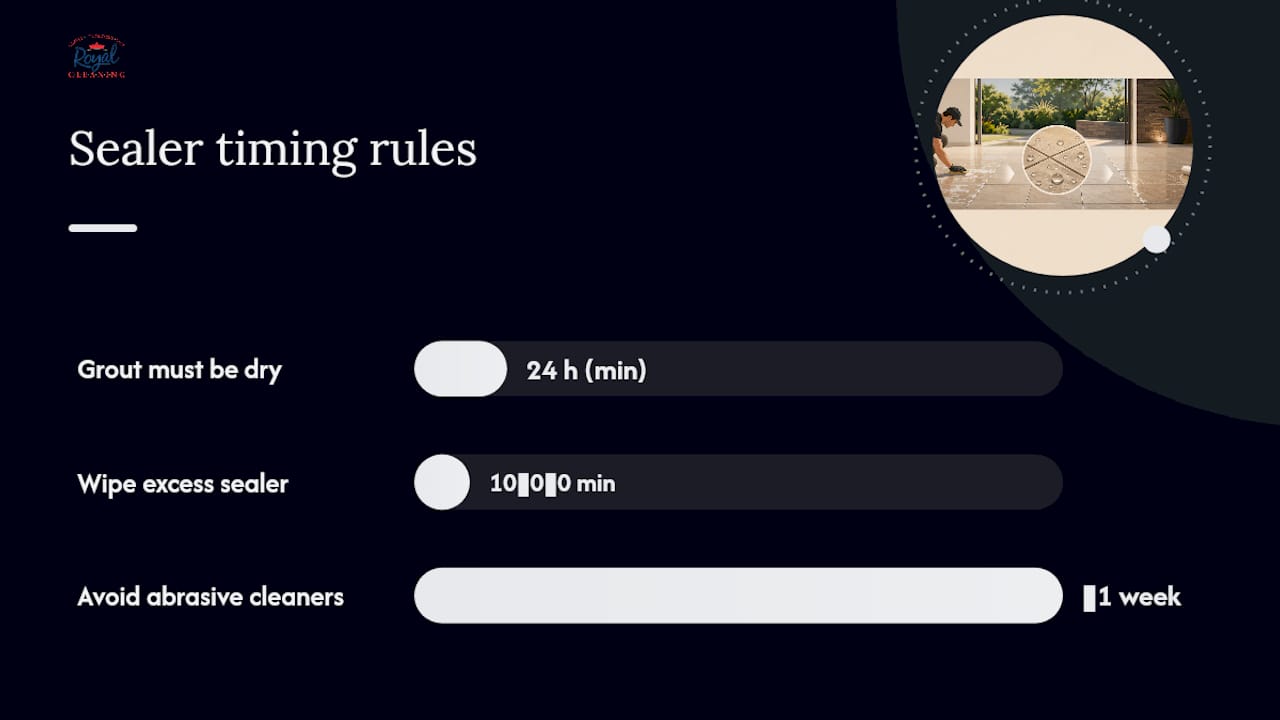
- Let it dry completely. Grout must be bone dry, usually 24 hours minimum in a ventilated room, before sealer goes on.
- Apply the sealer. Use a small brush or applicator for precision on grout lines, or a pump sprayer for larger floors, following the coverage rate on the label.
- Wipe excess off the tile surface within the timeframe the manufacturer specifies, typically 10 to 20 minutes, before it hazes over.
- Ventilate the room during and after application, since many sealers carry fumes worth avoiding in an enclosed space.
DIY works fine for small bathrooms or a single backsplash if you have the time and the patience for careful edge work. Hiring a professional makes more sense for large floor areas, grout that’s heavily stained or already crumbling, or when you want a warranty backing the work. UltraCare’s technical documentation notes that a quality impregnating sealer can protect grout for several years under the right conditions, but that lifespan depends heavily on correct prep and application, which is exactly where a professional service earns its cost back.
Pro Tip: Skip abrasive cleaners for at least a week after sealing. They can wear down fresh sealant before it’s fully cured.
Myths That Convince Homeowners to Skip Sealing
“New grout never needs sealing” is one of the most common myths out there, and it’s only half true. Most cement-based grout does need it eventually, just not immediately, since it has to cure first.
- Some installers skip sealing because the grout is epoxy, which genuinely doesn’t need it.
- Others skip it due to project timing or because a warranty covers sealing as a separate service later.
- Always confirm in writing what your installer did or didn’t seal, and never seal over existing stains. Clean or restore the grout first, or you’ll lock discoloration in for good.
A Grout Specialist’s Take on Sealing After Cleaning
Professional tile and grout services emphasize that sealing without cleaning first is a wasted trip. A multi-step tile and grout process removes soap scum, mineral deposits, and embedded stains before any sealant goes down, and may use eco-friendly products where they perform as well as harsher alternatives.
What we see consistently: homes that get professional cleaning paired with sealing keep that “just cleaned” look far longer than homes that skip one step or the other. That lines up with industry findings on cleaning-before-sealing, which show sealed grout retains cleaning results considerably longer than unsealed grout.
For a small guest bathroom, DIY sealing is reasonable if you’re diligent about drying time. For kitchens, showers, or floors with years of buildup, professional service tends to be worth the cost, mainly because proper stain removal before sealing is harder to do right than the sealing step itself.
— Bernadette
Book Grout Sealing With Royal Carpet and Tile Cleaning
Some professional cleaning services offer bundled options: a full deep clean followed by professional-grade sealing in one visit, with transparent pricing and no hidden add-ons.

Our tile and grout cleaning and sealing service starts with the same deep-clean process outlined above, stripping soap scum and hard-water buildup before sealant ever touches the grout line. That order matters. Sealing over dirt just locks it in, and it’s a mistake we see often in kits sold for weekend DIY jobs. When you book a visit, our team assesses your grout’s condition, recommends penetrating or topical sealant based on the room, and applies it with commercial equipment that reaches deeper than a store-bought brush kit.
If your bathroom, kitchen, or backsplash grout hasn’t been resealed in over a year, request a free estimate through our tile and grout service page and we’ll walk you through what your specific tile needs.
Sources
- Does Grout Need to be Sealed | Mapei
- Protecting Grout After an Installation – This Old House
- How to seal grout (BHG)
- Grout sealer definition (The Spruce)
FAQ
Is Sealing Grout Really Necessary?
For cement-based grout, yes, it’s generally recommended because it resists stains and slows moisture absorption, even though manufacturers don’t always classify it as strictly required. Epoxy grout is the exception since it’s already sealed by nature.
Why Do Some Builders Skip Sealing New Grout?
Builders sometimes skip it because new grout needs to fully cure first, often 48 to 72 hours, before sealant will bond properly. Others skip it because the grout is epoxy, or because sealing is offered as a separate follow-up service.
Is It Ever Too Late to Seal Grout?
No, but you should clean the grout thoroughly first. Sealing over old stains or grime locks that discoloration in permanently, so a deep clean, like the one described in Royal Carpet and Tile Cleaning’s tile and grout process, should always come before sealing.
How Often Should You Seal Your Grout?
Showers and bathtubs typically need resealing every 6 to 24 months, kitchen floors and backsplashes every 1 to 3 years, and low-traffic rooms every 2 to 3 years. Run a water-bead test periodically to confirm whether your grout still repels moisture.
Does Royal Carpet and Tile Cleaning Offer Grout Sealing?
Yes, Royal Carpet and Tile Cleaning provides professional tile and grout cleaning paired with grout sealing for Albuquerque area homes. Pricing is available on request through the tile and grout service page.